This guide covers:
- Start here
- Understand the Digital Crown
- Understand the Side Button
- Learn the Gestures
- Make sure your iPhone can unlock your Apple Watch
- Create your own watch face(s)
- Track daily activity
- Start using health features
- Understand safety features
- Go for your first workout
- Set up Apple Pay
- Ping your iPhone
- Understand Control Center
- Understand and use the Smart Stack
- Unlock your Mac with Apple Watch
- Use Double Tap
- Understand sounds and notifications
- Organize your apps
- See and respond to notifications
- Use your Apple Watch without your iPhone nearby
- Set up cellular service
- Use a fast charger
- Watch these videos
- Remember, this is just the beginning
Start here:
Start by making sure your iPhone is running the very latest and greatest software (Settings -> General -> Software update).
While it’s updating, watch this video:
Then follow Apple’s guide on setting up a new Apple Watch, my own guide will take over after the steps in this one is completed.
Video version of the same above guide:
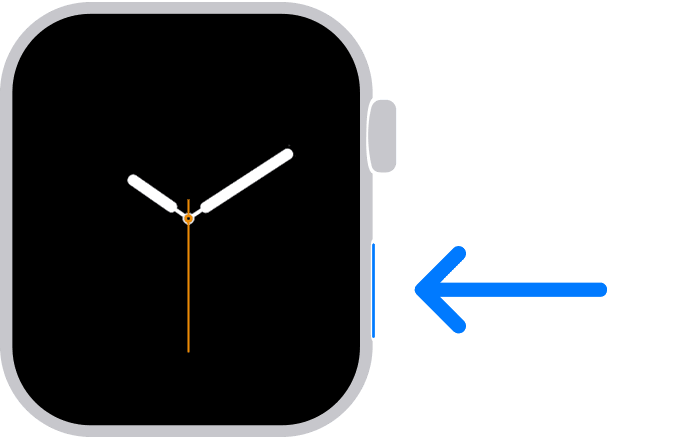
Understand the Digital Crown
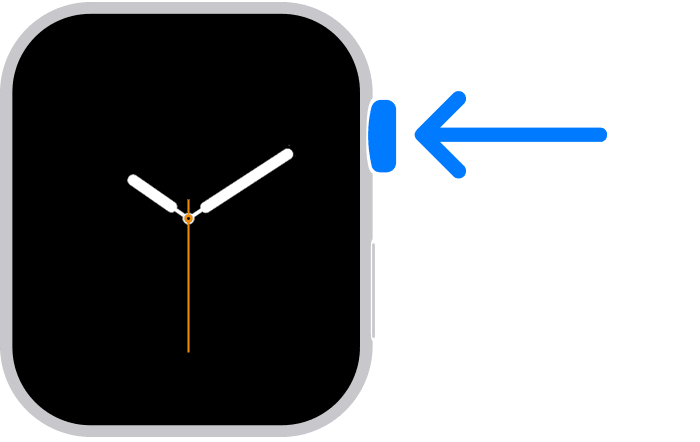
The Digital Crown is the top right button and wheel on your watch, as per above photo. It does a lot of things:
- Press it to see the watch face or Home screen.
- Double-click it to open the App Switcher.
- Press and hold it to use Siri.
- Spin it upward while on the watch face to use the Smart Stack.
- Spin it downward while on the watch face to show your notifications
- Spin it to zoom, scroll, or adjust what’s on the screen.
- Press and hold it to unlock the screen after a water workout.
Understand the Side Button
The side button is sitting below the Digital Crown and does the following:
- Press it to show or hide Control Center.
- Press it and hold to use Emergency SOS.
- Double-click it to use Apple Pay.
- Press and hold it to turn your watch on or off.
Learn the Gestures
You can use gestures to interact with your Apple Watch. Your watch performs different functions when you tap its screen or press it for a longer time.
- Tap the screen to select a button or item. A tap also brings the screen to full brightness when the watch is in Always-on mode
- Tap and hold – tap the screen and keep your finger in place to change the watch face, see options in an app, and more.
- Drag your finger across the screen to scroll or adjust a
- Swipe up, down, left
Make sure your iPhone can unlock your Apple Watch
Go to the Apple Watch app on your iPhone, tap My Watch, tap Passcode, then turn on Unlock with iPhone.
Your iPhone must be within normal Bluetooth range (about 33 feet or 10 meters) of your Apple Watch to unlock it. If Bluetooth is off on Apple Watch, enter the passcode on your watch to unlock it.
This means every time your iPhone gets unlocked, by Face ID or otherwise, if your Apple Watch is on your wrist, it unlocks as well. No passcode entering needed.

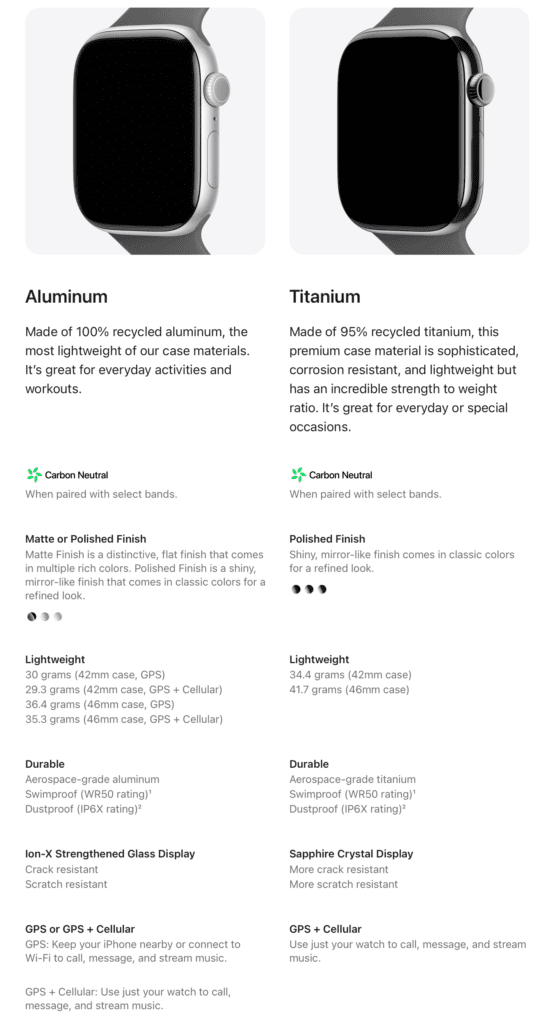
Create your own watch face(s)
Start by exploring all the faces that are available which is best done in the Watch-app on your iPhone, go to the tab “Watch Gallery”. Also explore Apple’s online guide to all the faces that explain their features.
You do not need to pick only one face. It is easy to switch between a few favorites, and you can also link specific Focus modes to specific watch faces.
Track daily activity
Your Apple Watch keeps track of your movement throughout the day and encourages you to meet your fitness goals. It tracks how often you stand, how much you move, and how many minutes of exercise you do – automatically in the background and no need to start workouts for this.
Three rings in different colors summarize your progress. The goal is to sit less, move more, and get some exercise by completing each ring every day.
The Fitness app on your iPhone keeps a record of your activity. If you’ve tracked at least six months of activity, it displays daily trend data for active calories, exercise minutes, stand hours, stand minutes, walk distance, cardio fitness, walking pace, and more. In the Fitness app on iPhone, tap Summary, then scroll to Trends to see how you’re doing compared to your average activity.
Read on in the below article how this all works and how to set it up to work best for you. To get accurate measurements, make sure you have followed the steps in the last article here.
Start using health features
Your Apple Watch can help you meet your sleep goals, track important information related to your heart, track your nightly sleep body temperature, identify sleep apnea, keep a log of your emotions and mood, log your medications and track your menstrual cycle – and much more.
Sleeping with your Apple Watch is an essential part of the experience, as only then can many of the measurements accurately happen. So just get into the habit. See the tip below on how to always fast-charge your Apple Watch – and you will only need to drop it on the charger while in the shower or a similar quick 15-20 minute activity – and you will never run out of charge. If you forgot to charge, 8 minutes on a fast charger is enough to sleep track a whole night.
Understand safety features
One of the main benefits of the Apple Watch is its many life-saving safety features. The above video showcases only real people and their real stories of how the Apple Watch has helped them.
It’s good to understand what these features are and how they work.
Have a look through the most important ones below (how to contact emergency services, set up your Medical ID, and understand how to use Check In):
Go for your first workout

Your Apple Watch can accurately track and give you insights for all kinds of workouts – from basics like running, cycling and swimming – to more advanced like pilates, dance, stair stepper and so on.
Check out the below links for how to start a workout and what workout types are supported and how they differ from each other:
Set up Apple Pay
Stop paying with plastic cards, and stop paying with your iPhone! The Apple Pay experience is its best with Apple Watch. Besides adding your credit cards (which you should do first), you can also add many loyalty cards such as self-scanning for many grocery chains and some cars even support Apple CarKey which exists then in the Apple Wallet app.
Ping your iPhone
You can use your watch to find your iPhone nearby by pinging it (and your iPhone can similarly ping your Apple Watch).
- Press the side button to open Control Center on Apple Watch.
- Tap the icon that looks like a shaking/vibrating iPhone
Your iPhone plays a sound, and if Apple Watch is within range and you have a newer iPhone, the screen also displays a general heading and distance to your iPhone—50 feet, for example.
If your iPhone isn’t in range of Apple Watch, try using Find My from iCloud.com.
TIP: If it’s dark, press and hold the ping iPhone-icon and it will also make the flashlight go off on the iPhone to make finding it easier.
Understand Control Center
Control Center is what opens when you press the Side Button (see first tip). This is an important part of the Apple Watch and you should know how to use it, what its features are and how to customize it:
Understand and use the Smart Stack
The Smart Stack is one of the best more recent additions to the watchOS operating system. You get to it by scrolling upwards on the Digital Crown. This stack of widgets dynamically change and update throughout the day, and can show you many things: Playback Controls if something is playing nearby, sleep tracking if you just awoke, song recognition if it hears a song playing, weather, your activity rings, Live Activities from your iPhone such as good delivery, Uber pickup status, and so on.
It uses information such as the time, your location, and your activity to automatically display the most relevant widgets at the appropriate time in your day. You can also add and remove your own preferred widgets to this stack, but I recommend letting it be dynamic.
Check out the video and the article below to fully understand this feature.
Unlock your Mac with Apple Watch
If you have a Mac that is newer than 2013 (so they can be pretty old!) it is possible to unlock your Mac automatically when sitting down in front of it, just by wearing your Apple Watch. This means you can set a secure password and require it after screensaver (which is a best practice) and not be bothered often to enter it because your Apple Watch will take care of it.
Set up is easy, just follow:
Use Siri
Siri on Apple Watch is one of my most-used features. If you did not change the default settings, you just clearly raise your wrist toward you and start talking about Siri will be triggered automatically. You can also trigger Siri press and holding the Digital Crown until you see the listening indicator, and start talking.
Use Double Tap
You can use the double tap gesture to answer a call, reply to a message, see and scroll through your Smart Stack, scroll through supported apps, and more.
Tap your index finger and thumb together twice, using just the hand that wears the Apple Watch, and magic happens:
Understand sounds and notifications
First of all: use your Apple Watch basically always and only in Silent Mode, is my recommendation. The haptic taps it provides is enough. Silent Mode is nice to have off during longer workouts though, but other than that no need.
Learn how to do that below, as well as how to customize notifications. But don’t turn off notifications – that’s like the top feature of the Apple Watch. Use Focus modes instead:
Organize your apps
Make sure you are moving your most frequently used apps to the top of the app grid view, so you can quickly access them (remember, one press on the Digital Crown opens the Home view which shows all apps). It is very easy to do this, just follow:
See and respond to notifications
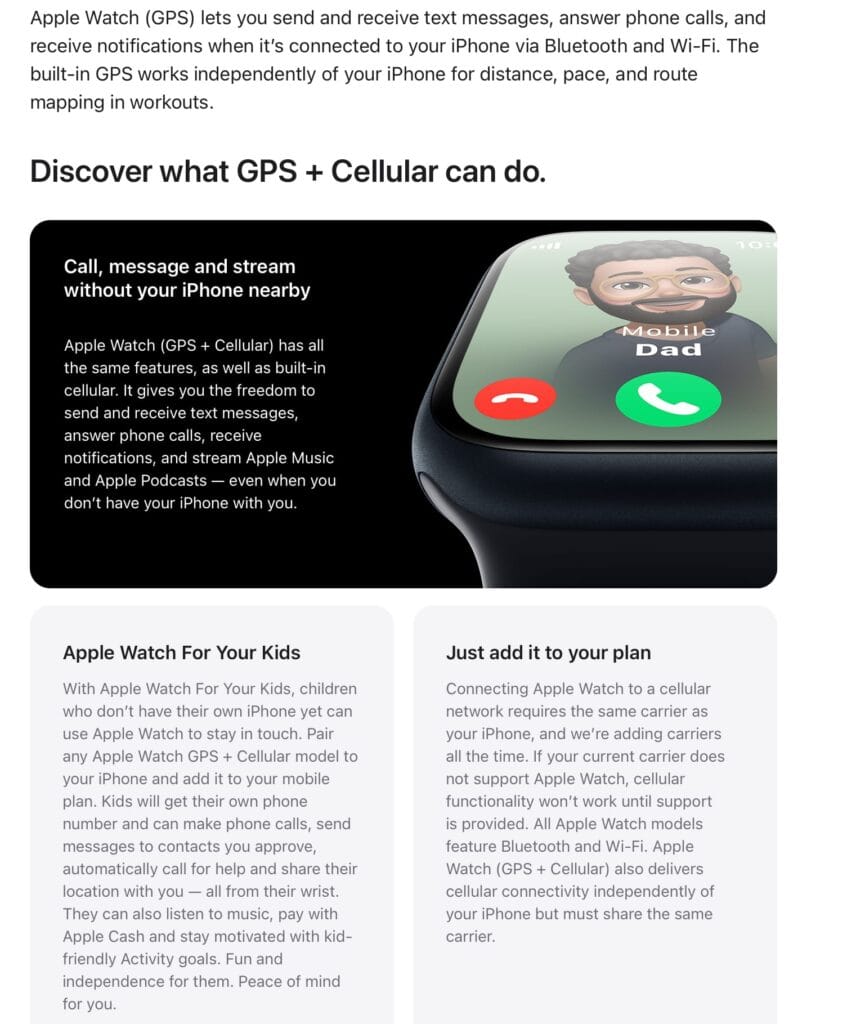
Use your Apple Watch without your iPhone nearby
If you bought your Apple Watch with cellular and have an active cellular plan, there are no limits to what you can do with your Apple Watch even if your iPhone is not nearby. If however, you did not buy an Apple Watch with cellular, there are still things you can do without your iPhone, read on for details:
Set up cellular service
Make sure you’ve setup cellular service in case you bought your Apple Watch with cellular, which I recommend:
Use a fast charger
Make sure you are charging your Apple Watch in fast-charge mode – that gives 0-80% battery in around 30 minutes. You should always charge this way, and it means you only need to drop it on a charger for 10-20 minutes every day and you can wear it 24/7.
To achieve fast charging for Apple Watch, make sure you use the included charging cable with either a:
- Apple 18W, 20W, 29W, 30W, 35W, 61W, 87W, or 96W USB-C Power Adapter, or:
- A comparable third-party USB-C power adapter that supports USB Power Delivery (USB-PD) of 5W or greater
More below:
Watch these videos
Here’s a small collection of additional short videos I recommend watching to learn more features of your Apple Watch.
Remember, this is just the beginning
There is so much more to explore with the Apple Watch beyond what has been listed here. The Apple Watch is an entire computer on your wrist, with a full dedicated operating system on it – and it is way more powerful than a “smart activity band” as well as other smart watches.
The below list is just examples of more things to explore at some point, but it is far, far from exhaustive.
- Track medication
- Measure noise levels
- Camera Remote – take photos with your iPhone with your Apple Watch
- Control Apple TV
- Take an ECG
- Perform a mindfulness session
- Learn and use Shortcuts
- Choose sound output
- Use with headphones or speakers
- Walkie-talkie
- Voice Memos
- Translate app
- Podcasts and audio books
- Measure water temperature, and water depth
- Control your home
- Navigate with Maps and download offline maps
- Create a custom workout
And all this is still before we get into 3rd party apps. On the Apple Watch App Store there are literally tens of thousands of Apple Watch apps made by developers other than Apple which enable even more cool things and expand what your Apple Watch can do.